Introduction to Butterflake Rolls
When it comes to warm, comforting baked goods, few creations can rival butterflake rolls. These delightful rolls, with their flaky layers and buttery richness, are a surefire way to elevate any meal, whether it’s a cozy family dinner or a festive holiday gathering. But what exactly are these magical morsels, and why should you consider adding them to your baking repertoire?
What are Butterflake Rolls and Why Are They a Game Changer?
Butterflake rolls are essentially soft, fluffy rolls made from an enriched dough that is layered with butter. This technique gives them their characteristic flakiness, much like a croissant, but without the advanced skill level needed for laminated dough. The layers create a beautiful texture that offers a satisfying bite, combined with a rich buttery flavor that melts in your mouth.
Here’s why butterflake rolls could change the way you think about bread:
-
Versatility: These rolls can complement virtually any meal. They pair wonderfully with soups, stews, and even a special roast chicken made with chicken ham. Imagine serving them at a dinner party, with guests tearing off the layers and enjoying them with a drizzle of honey or a spread of herb butter.
-
Texture and Flavor: The delightful contrast of crispy exteriors and soft, airy interiors provides a comforting mouthfeel. Each bite is a buttery explosion that feels indulgent yet homey.
-
Easy to Customize: Want to infuse some extra flavor? Add ingredients like garlic powder, herbs, or even turkey bacon for a savory twist. You can also sweeten the deal by incorporating cinnamon or nutmeg for a breakfast roll that pairs beautifully with coffee.
-
Make Ahead: The beauty of butterflake rolls lies in their make-ahead nature. Prepare the dough in advance, shape the rolls, and pop them in the fridge overnight for a flawless baking experience the next day.
In addition to their deliciousness, butterflake rolls can impress your friends and family, even if you’re still mastering your kitchen skills. Plus, check out resources from King Arthur Baking for even more tips on achieving perfect rolls every time.
Ready to bring these irresistible rolls into your home? Let’s roll up our sleeves and get started!
Ingredients for Butterflake Rolls
When it comes to creating the perfect butterflake rolls, the ingredients you choose play a pivotal role in achieving that light, flaky texture we all adore. Let’s dive into what you’ll need for this delightful recipe:
Essential Components
- All-Purpose Flour: The backbone of your rolls, providing structure and a fluffiness that’s hard to resist. Aim for high-quality flour for the best results.
- Yeast: Fresh active dry yeast will help your rolls rise beautifully. Make sure it’s within its expiration date to guarantee that perfect fluff.
- Butter: Lots of it! Unsalted butter is essential for that rich flavor and flaky layers—around a cup should do.
- Milk: Using warm milk helps activate the yeast, making your rolls extra tender. Whole milk works wonderfully!
- Sugar: A touch of sugar not only adds flavor but also feeds the yeast, contributing to the rise.
- Salt: Don’t skip this! A pinch of salt enhances all the flavors in your rolls.
Optional Fillings
You can get creative with fillings, such as Turkey Bacon or Chicken Ham, depending on your taste. Cheese is a popular choice too!
Using these high-quality ingredients sets you up for success, whether you’re planning a cozy family dinner or a festive gathering. Check out Serious Eats for more tips on ingredient selection to elevate your baking game.
Preparing Butterflake Rolls
If you’ve ever tasted the soft, airy delight of butterflake rolls, you know they can elevate any meal, whether it’s a holiday gathering or a cozy dinner at home. Making them from scratch may seem daunting, but with the right guidance, you’ll be creating these delicious rolls in no time. Let’s walk through the steps together!
Gather Your Ingredients
Before we dive into the magic of baking, it’s essential to gather all your ingredients. For butterflake rolls, you’ll need the following:
- 4 cups all-purpose flour
- 1 cup milk
- 1/4 cup granulated sugar
- 1 packet (2¼ teaspoons) active dry yeast
- 1/3 cup softened butter, plus extra for brushing
- 1 teaspoon salt
- 2 large eggs
Having everything on hand will make the process smoother and more enjoyable.
Grease Your Muffin Pan
Next, prepare your muffin pan by greasing it generously with butter or non-stick spray. This step is crucial because it ensures that your butterflake rolls come out easily after baking. If you prefer, you could also use silicone muffin pans for even easier release.
Roll Out the Dough
Once your ingredients are mixed and your dough is rising (more on that shortly), it’s time to roll it out. On a floured surface, roll the dough into a rectangle about 1/4 inch thick. The dough should be pliable but not crumbly—this is where you’ll fold in the magic of multiple layers.
Brush with Melted Butter
After rolling out the dough, melt a bit more butter—about 1/4 cup should do it. Brush this melted butter over the surface of the dough. This step not only adds flavor but creates the butterflake effect we all love. Why is it essential to brush the dough? It helps to separate layers, resulting in those delicious flaky textures we crave!
Create and Stack Strips
Now for a fun part—cutting! Take a pizza cutter or a sharp knife and cut the dough into strips, about 1-2 inches wide. You can stack these strips on top of each other, with the buttery side facing in. This layering process mimics how puff pastry rises, giving your rolls that signature fluffiness.
Cut and Arrange the Dough
Next, cut your stacked strips into smaller pieces, usually about 1 inch long. This is your chance to be creative! You can arrange these pieces neatly in your greased muffin pan. Imagine your rolls piled high, and don’t worry about them being perfect—the beauty of homemade baking is its charming imperfections.
Let the Dough Rise
Once your dough pieces are arranged, cover them with a clean kitchen towel and let them rise in a warm place for about 30 minutes. During this time, they will puff up and nearly double in size. Practical tip: you can place the pan in a turned-off oven of around 100°F to expedite the rising process!
Preheat the Oven and Prepare to Bake
While your rolls are rising, it’s time to preheat your oven to 375°F (190°C). Make sure to check that it’s fully heated before popping the rolls in to ensure even baking.
Bake to Golden Perfection
After your rolls have risen, place them in the preheated oven. Bake them for about 15-20 minutes, or until they are golden brown. The aroma will fill your kitchen, making it hard to resist sneaking a bite before they’re even cool!
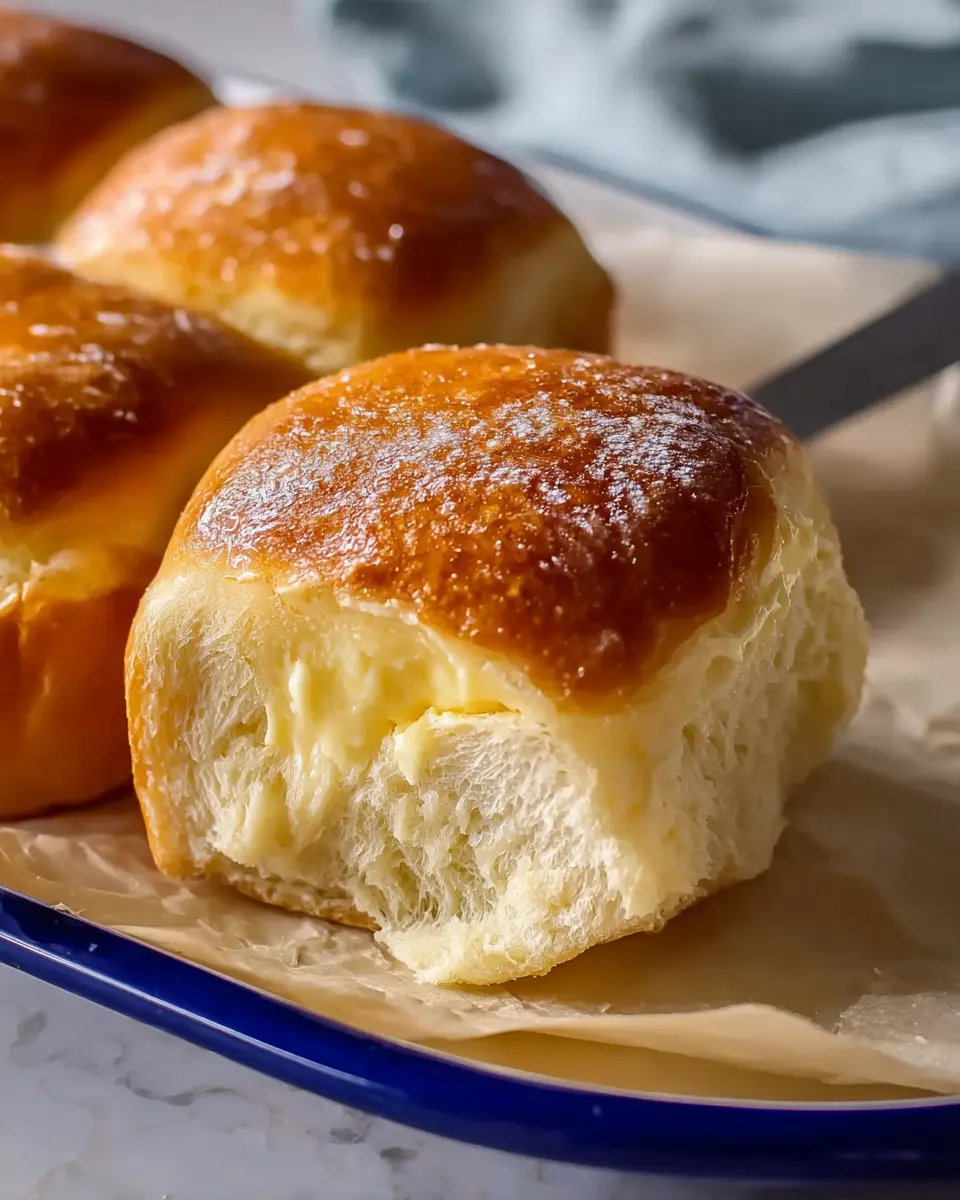
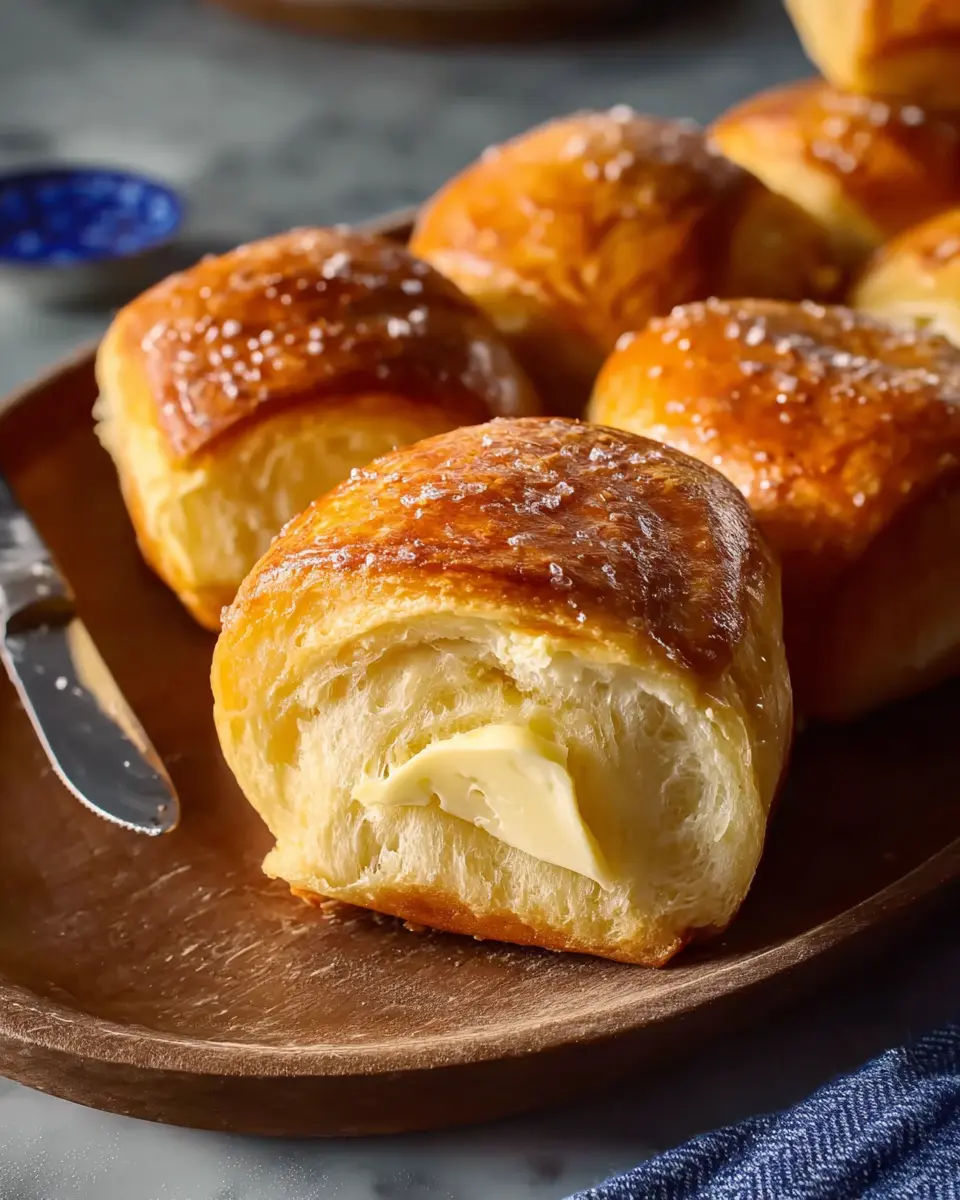
Brush with Butter and Let Cool
As soon as your rolls come out of the oven, brush them with melted butter once more. This final touch not only adds a glossy finish but enhances that buttery flavor. Let them cool for a few minutes in the pan before transferring them to a wire rack.
By following these steps, you’ll have wonderfully fluffy butterflake rolls ready to serve. Whether you enjoy them on their own or alongside your favorite dish of Chicken Ham or Turkey Bacon, these rolls are sure to please everyone at the table. Happy baking!
For more tips on baking and creating delightful dishes, check out The Kitchn for reliable recipes and kitchen advice!

Variations on Butterflake Rolls
Creating butterflake rolls isn’t just about following the recipe; it’s a chance to get a bit creative in the kitchen! Here are some delightful variations that can elevate your rolls and impress your guests.
Herb-Infused Butterflake Rolls
Imagine biting into a butterflake roll infused with fresh herbs. Adding a blend of rosemary, thyme, and parsley to your butter mixture can make a world of difference. Simply chop your favorite herbs finely and mix them into the melted butter before slathering it between the layers of dough. Not only will your rolls look appetizing, but they’ll also have an unforgettable flavor. Fresh herbs are packed with antioxidants and vitamins, adding a nutritious touch to your meal.
Honey Butter Glaze Option
If you’re in the mood for something sweet, consider drizzling a honey butter glaze over your butterflake rolls. This sweet and sticky topping pairs perfectly with the buttery layers. Just combine melted butter with honey and a pinch of salt; then, brush it generously over the warm rolls right after baking. This glaze can turn your everyday rolls into a dessert-like experience—perfect for gatherings or holiday dinners.
Cheese-Stuffed Butterflake Rolls
For cheese lovers, cheese-stuffed butterflake rolls are a must-try! Simply place a slice of your favorite cheese (think sharp cheddar or creamy mozzarella) in the center of each roll before you layer and shape them. When baked, the cheese melts into gooey goodness, making every bite utterly delectable. You can find more tips and tricks for customizing butterflake rolls here.
With these variations, your butterflake rolls will not only be fluffy and buttery but also bursting with flavor that everyone will love! So go ahead, experiment and make them your own!
Cooking Tips and Notes for Butterflake Rolls
Making butterflake rolls can feel like an art, and these tips will help you master the technique like a pro.
Perfecting Your Dough
- Use Quality Ingredients: The purity of your butter and flour influences texture and flavor, so opt for high-quality products.
- Kneading Is Key: Ensure you knead the dough until it’s smooth and elastic. This can take about 8-10 minutes by hand. If you’re short on time, a stand mixer does the trick!
- Keep It Cool: If the dough gets too warm, it can become tough. If you’re working in a warm kitchen, chill your butter and even your flour to maintain the right consistency.
Layering the Rolls
- Timing for Flakiness: Allow each layer of butter to rest before adding more dough. This is crucial for that signature flakiness.
- How to Shape: For a fun twist, consider adding Turkey Bacon or Chicken Ham into your rolls for extra flavor, creating a delightful surprise in each bite.
Finish with a Shine
- Brush with Butter: For a gorgeous, golden-brown finish, brush the rolls with melted butter right before and after baking. It not only enhances the flavor but makes for a beautiful presentation.
Master these elements, and your butterflake rolls will be the talk of every gathering. For more insights, check out resources like King Arthur Baking and Serious Eats. Happy baking!
Serving Suggestions for Butterflake Rolls
Pair with Soups and Salads
One delightful way to enjoy butterflake rolls is by pairing them with your favorite soups or salads. Picture a bowl of creamy tomato soup, complemented perfectly by the airy, buttery texture of these rolls. They’re not just a side; they turn a simple meal into a cozy experience. For a fresh twist, try them alongside a crisp garden salad tossed in a zesty vinaigrette. The rolls add a warm contrast that balances the meal beautifully.
Perfect for Breakfast Spreads
Think outside the standard breakfast box! These versatile butterflake rolls can shine bright on your morning table. Serve them warm with a spread of honey or homemade fruit preserves. If you’re feeling savory, top them with Turkey Bacon and a slice of creamy avocado for a satisfying breakfast sandwich that will keep you energized throughout your day. You can also consider matching them with a decadent butter spread, like this herb-infused butter from The Spruce Eats.
Great with Dipping Sauces
Who said rolls can’t be fun? Butterflake rolls are not just for munching; they’re also perfect for dipping! Serve them with a selection of dipping sauces like garlic herb butter or a spicy sriracha mayo. This option adds an interactive element to your meal—perfect for casual get-togethers. Plus, if you have any leftover rolls (though I doubt it), they make a fantastic companion to a hearty dip like hummus or spinach artichoke dip.
These serving suggestions not only elevate your meals but also allow you to enjoy every bite of those luscious butterflake rolls. Happy cooking!
Time Breakdown for Butterflake Rolls
Creating butterflake rolls is an enjoyable process that yields fantastic results. Here’s how to allocate your time efficiently:
Preparation Time
You’ll need about 30 minutes to gather ingredients, mix the dough, and shape the rolls. It’s a great time to put on some music and enjoy the cooking process!
Rising Time
Allow your dough to rise for approximately 1 to 1.5 hours. This is when the magic happens! Make sure your kitchen is warm to help the yeast activate—consider reading about yeast activation techniques here.
Baking Time
Once your rolls are ready, bake them for about 15-20 minutes until they’re golden brown and inviting. The aroma will surely make your kitchen feel like home!
Total Time
In total, you’ll be spending around 2 to 2.5 hours from start to finish. Trust me, the umami explosion when you bite into a butterflake roll is well worth the investment!
Nutritional Facts for Butterflake Rolls
When whipping up a batch of butterflake rolls, it’s essential to know what’s in them, especially if you’re trying to balance taste and nutrition. Here’s a quick breakdown of the nutritional facts you can expect from these delicious rolls.
Calories
A single butterflake roll typically contains around 120 calories. While that might seem manageable, be mindful of how many you enjoy during dinner!
Carbohydrates
These rolls pack about 20 grams of carbohydrates each, making them a comforting side but also a source of quick energy. If you’re watching your carb intake, consider pairing them with a protein-rich dish, such as grilled chicken or turkey bacon.
Fats
With approximately 5 grams of fat per roll, you’re getting a taste of buttery goodness. Most of this fat comes from the unsalted butter used in the recipe, which adds to the flavor while also contributing to the overall richness.
For more detailed nutritional breakdowns, check out resources like the U.S. Department of Agriculture’s FoodData Central or dietary guidelines from the American Heart Association. Knowing this can help you balance your meals while still enjoying those delightful butterflake rolls!
FAQs about Butterflake Rolls
Ready to dive into some common questions about butterflake rolls? We’ve got you covered!
Can I use fresh bread dough instead of frozen?
Absolutely! Using fresh bread dough can give your butterflake rolls a wonderful homemade vibe. Just allow it to go through the necessary rising stages as indicated in your recipe. Fresh dough tends to be a bit softer, so you might need to adjust baking times slightly, but the flavor will be fantastic!
What’s the best way to store leftover rolls?
If you find yourself with leftover butterflake rolls, storing them properly can extend their deliciousness. Here’s how to do it:
- Room Temperature: Keep them in an airtight container for up to 2 days.
- Refrigerator: For longer-lasting rolls, wrap them tightly in foil or cling film. They can last about a week.
Check out FoodSafety.gov for more tips on food storage!
Can I freeze butterflake rolls?
Yes! Freezing is an excellent way to preserve your butterflake rolls. Just wrap each roll in plastic wrap and then place them in a freezer bag. They can be frozen for up to three months. When you’re ready to enjoy them, simply thaw overnight in the fridge.
What’s the best way to reheat them?
Reheating can make your butterflake rolls taste freshly baked again! Try these methods:
- Oven: Preheat to 350°F (175°C) and heat for 10-15 minutes.
- Microwave: Place a roll on a microwave-safe plate and heat for about 15-20 seconds. Just be cautious not to overdo it, or you’ll end up with dry rolls.
Hopefully, these FAQs help you enjoy your delicious butterflake rolls even more! Happy baking!
Conclusion on Butterflake Rolls
Why You Should Make These Rolls Today!
There’s something special about buttery, flaky rolls that can transform any meal into a feast. Butterflake rolls are not just a treat for your taste buds—they’re also surprisingly easy to whip up! Imagine the rich aroma filling your kitchen as they bake, making it hard to resist indulging even before dinner is served.
- Simple Ingredients: You likely have everything you need at home.
- Perfect for Any Occasion: Whether it’s a casual dinner or a festive gathering, everyone will love them.
- Pairing Options: They complement meals beautifully, especially with chicken ham or turkey bacon.
So why wait? Get baking today, and treat yourself to this delightful experience that will surely impress your family and friends. For tips on perfecting your baking skills, check out King Arthur Baking for some expert advice!
PrintButterflake Rolls: The Best Homemade Rolls You’ll Ever Make
A delicious and easy recipe for homemade butterflake rolls that will impress anyone at your dinner table.
- Prep Time: 20 minutes
- Cook Time: 20 minutes
- Total Time: 1 hour 40 minutes
- Yield: 12 rolls 1x
- Category: Bread
- Method: Baking
- Cuisine: American
- Diet: Vegetarian
Ingredients
- 4 cups all-purpose flour
- 1/4 cup granulated sugar
- 1 packet active dry yeast
- 1 teaspoon salt
- 1 cup milk
- 1/2 cup unsalted butter
- 2 large eggs
Instructions
- In a large bowl, combine flour, sugar, yeast, and salt.
- Warm milk and butter until melted, then add to the dry ingredients.
- Add eggs and mix until a dough forms.
- Knead the dough for about 10 minutes until smooth.
- Let the dough rise in a warm place until doubled in size, about 1 hour.
- Punch down the dough and divide into small pieces to shape into rolls.
- Place rolls in a greased baking dish and let rise again for 30 minutes.
- Bake in a preheated oven at 375°F for 15-20 minutes until golden brown.
- Brush with butter before serving.
Notes
- For a richer flavor, use buttermilk instead of regular milk.
- These rolls freeze well; store in an airtight container.
Nutrition
- Serving Size: 1 roll
- Calories: 150
- Sugar: 2g
- Sodium: 150mg
- Fat: 7g
- Saturated Fat: 4g
- Unsaturated Fat: 2g
- Trans Fat: 0g
- Carbohydrates: 20g
- Fiber: 1g
- Protein: 3g
- Cholesterol: 30mg
Keywords: Butterflake Rolls, Homemade Rolls, Dinner Rolls