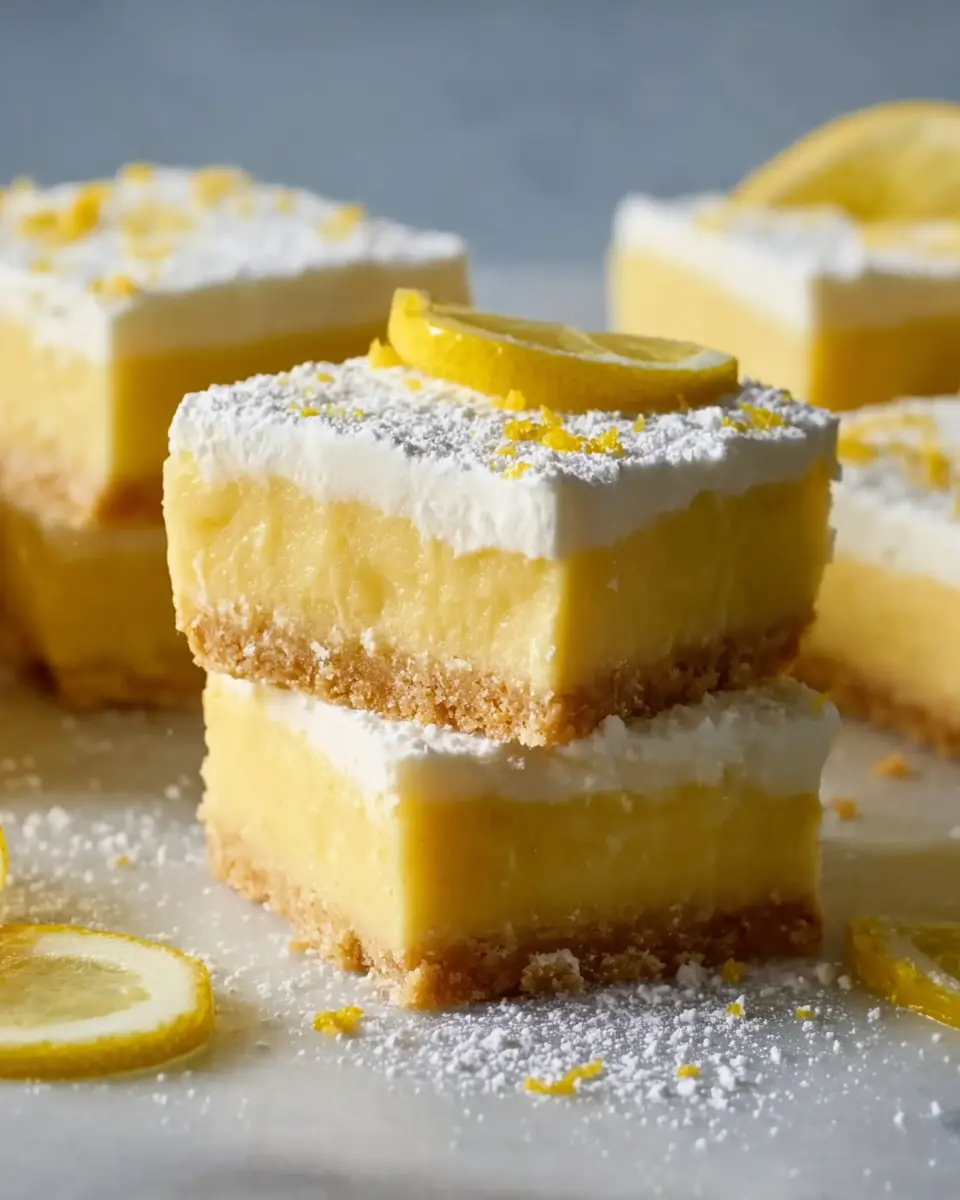
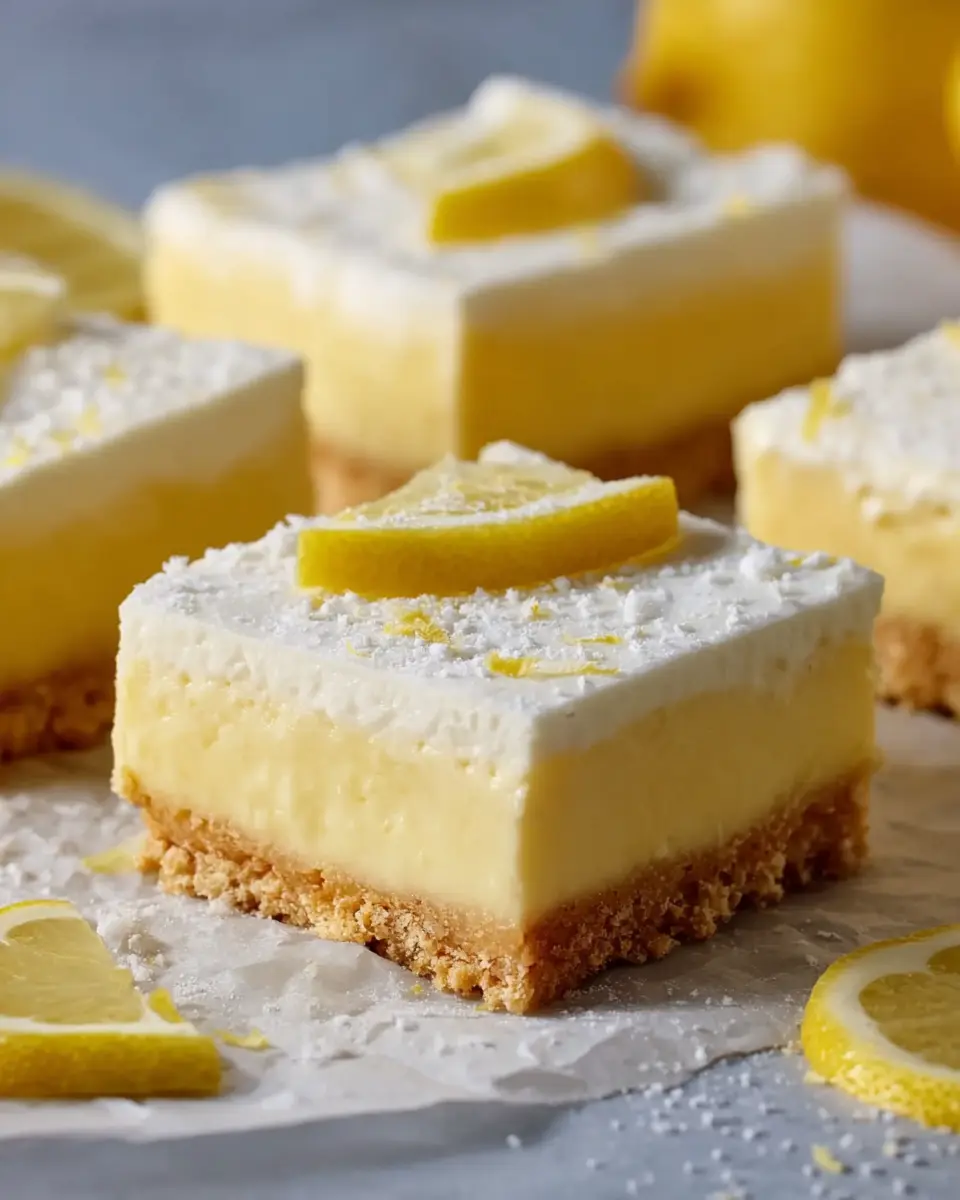
Introduction to No Bake Lemon Bars
When the craving for something sweet strikes, no bake lemon bars are a delightful choice that shouldn’t be overlooked. These bright, tangy treats are perfect for any occasion, whether you’re hosting a summer barbecue, planning a picnic, or just indulging yourself on a lazy afternoon. Their refreshing flavor paired with a creamy texture makes them irresistible!
Why No Bake Lemon Bars are a Must-Try Dessert
First off, let’s talk about convenience. The beauty of no bake lemon bars lies in their simplicity. There’s no oven involved, which means less heating up your kitchen—especially welcome during those hot summer months! Just imagine: crushing some crackers, mixing a few ingredients, and allowing the magic to happen in your fridge. It’s a no-fuss, hassle-free dessert.
Another reason to love these lemon bars is their versatility. You can easily tweak the recipe to suit your dietary preferences. Want to go gluten-free? Simply swap regular crackers for gluten-free options. Or, if you’re looking for a little extra richness, add a swirl of whipped cream on top before serving. The possibilities are endless, and the creativity is part of the fun!
Moreover, the health benefits of lemons are noteworthy. Research shows that lemons are a fantastic source of vitamin C, which can boost your immune system and help with hydration. They can also aid digestion—who knew your dessert could be so beneficial? For more details on the health benefits of lemons, check out this article from Healthline.
Now, let’s not forget about the flavor! The combination of tart lemon and creamy filling atop a buttery crust creates a refreshing zing that is simply irresistible. Each bite feels like summer. Plus, they can often be made in advance, allowing you to serve them at a moment’s notice—a huge bonus for busy young professionals like yourself.
So, are you ready to impress your friends and family with this easy, delicious treat? Let’s dive into the recipe for these no bake lemon bars that will have everyone coming back for seconds!

Ingredients for No Bake Lemon Bars
Creating no bake lemon bars is not just a treat; it’s an experience that brightens up your day with its citrusy zest. Here’s what you’ll need to assemble this delightful dessert:
For the Crust
- 1 cup graham cracker crumbs: This forms the base and gives a wonderful crunch.
- 1/3 cup melted butter: Adds richness and binds the crumbs.
- 1/4 cup sugar: Just a touch of sweetness to balance the flavors.
For the Lemon Filling
- 1 cup freshly squeezed lemon juice: Essential for that bright, tangy flavor.
- 1 cup confectioners’ sugar: This gives the filling its delightful sweetness while maintaining a smooth texture.
- 2 cups whipped cream or a dairy-free alternative: Makes the mixture light and fluffy.
- Zest of 2 lemons: Adds an aromatic burst that heightens the lemony goodness.
Feel free to explore variations or substitute some ingredients to suit your taste! Interested in a gluten-free option? Consider using almond flour instead of graham cracker crumbs; it might just become your new favorite! For more tips on alternative ingredients, check out The Kitchn.
Now that you have your ingredients lined up, you’re all set for a fun and easy baking adventure—without the baking! What’s your favorite lemon dessert?
Preparing No Bake Lemon Bars
Getting ready to whip up some no bake lemon bars can be an incredibly rewarding experience. Not only are they deliciously tangy and sweet, but the best part? There’s no need to turn on the oven! Perfect for busy weeknights or last-minute gatherings, let’s dive into the simple steps involved in making these delightful treats.
Gather and Prepare Your Ingredients
Before we begin creating your no bake lemon bars, it’s essential to gather all the necessary ingredients and tools. Here’s a quick list to ensure you have everything on hand:
-
For the shortbread crust:
-
1 1/2 cups of graham cracker crumbs
-
1/2 cup of melted butter
-
1/4 cup of sugar
-
For the lemon filling:
-
1 cup of fresh lemon juice (approximately 4-6 lemons)
-
Zest of 2 lemons for that extra zing
-
1 can (14 ounces) of sweetened condensed milk
-
1/2 teaspoon of salt
-
For the whipped cream:
-
1 cup of heavy cream
-
2 tablespoons of powdered sugar
-
1 teaspoon of vanilla extract
Make sure to get fresh lemons for juicing—this makes a world of difference in flavor! Also, using a zesting tool can really help enhance the lemony aroma in your bars.
Create the Shortbread Crust
Once you have everything gathered, let’s create a delightful shortbread crust. This step is straightforward but crucial for building the foundation of your no bake lemon bars.
- In a medium bowl, mix together the graham cracker crumbs, melted butter, and sugar until well combined. The mixture should resemble wet sand.
- Press the mixture firmly into the bottom of a greased 9×9-inch pan. Use a flat-bottomed glass or your fingers to ensure it’s packed down tightly. A robust crust will hold your filling perfectly!
Pro tip: For an added crunch, you can blend in finely chopped nuts (like almonds or walnuts) into the crust mixture—just make sure they’re finely chopped to avoid a bumpy texture.
Make the Lemon Filling
Now it’s time to create the bright and refreshing filling that makes these no bake lemon bars memorable.
- In a large bowl, whisk together the fresh lemon juice, lemon zest, sweetened condensed milk, and salt until smooth.
- Make sure there are no lumps—you want a velvety texture that’ll complement the crust beautifully.
If you’re a lemon lover, consider adjusting the amount of juice to suit your taste, but be cautious not to go overboard, as it can impact the overall set of the filling.
Fold in the Whipped Cream
The next step adds a light, airy touch to your no bake lemon bars. Whipping cream is easy and gives a lovely texture to the filling.
- In a separate bowl, use an electric mixer to whip the heavy cream, powdered sugar, and vanilla extract on medium speed until soft peaks form. Think of cloud-like fluffiness!
- Gently fold this whipped cream into the lemon filling mixture until just combined. This folding technique helps keep the mixture light and airy, enhancing the overall experience.
Assemble and Chill
Finally, we bring all the elements together. This part is as simple as it is satisfying.
- Pour the lemon filling onto your cooled shortbread crust, spreading it evenly with a spatula.
- Cover the pan with plastic wrap or aluminum foil and place it in the refrigerator to chill for at least 4 hours or overnight. Patience is key here!
Before serving, you might consider garnishing with extra lemon zest or fresh berries for a pop of color and flavor. Check out these ideas on how to elevate your desserts from Martha Stewart.
Once set, cut them into squares or bars, and watch how quickly they disappear at your next gathering! Enjoy your refreshing no bake lemon bars, and savor every delightful bite.
Variations on No Bake Lemon Bars
No bake lemon bars are not just a delightful treat on their own; they can also be customized to cater to various tastes and dietary preferences. Here are a couple of unique ways to enjoy this refreshing dessert!
Lemon Bars with Fruit Toppings
Elevate your no bake lemon bars by adding your favorite fruits on top. Fresh berries like strawberries, blueberries, or raspberries not only provide vibrant color but also a burst of flavor that complements the zesty lemon. Consider these options:
- Mixed Berry Medley: Top with a mix of strawberries, blueberries, and raspberries for a tangy-sweet combo.
- Tropical Twist: Add slices of kiwi or pineapple to bring a tropical vibe to your bars.
The possibilities are endless! Just make sure to let your bars set completely before garnishing, so the fruit won’t slide off.
Gluten-Free Lemon Bars
If you’re looking for a gluten-free version of no bake lemon bars, it’s simpler than you might think. Use almond flour or gluten-free graham crackers for the crust. Here’s a quick guide:
- Crust: Swap regular graham crackers for gluten-free ones or make your own crust using almond flour and butter.
- Filling: Most traditional lemon filling recipes are naturally gluten-free, but double-check your sweetened condensed milk if you’re purchasing it.
By offering a gluten-free option, you’ll ensure everyone can enjoy this tangy treat! For tips on gluten-free baking, check out resources like the Gluten Intolerance Group.
These variations not only add flair to your no bake lemon bars but also allow you to create a dessert that everyone’s excited to enjoy. Try them out and let us know your favorite!
Cooking notes for No Bake Lemon Bars
When whipping up your delicious no bake lemon bars, a few handy tips can elevate your dessert game. Here are some cooking notes to keep in mind:
-
Ingredient Quality Matters: Always opt for fresh lemons. The brightness of fresh juice and zest makes a substantial difference in flavor.
-
Chilling is Key: After preparing your filling, allow the bars to chill for at least 2 hours. This helps them set properly, making for cleaner cuts and a firmer texture.
-
Variations to Consider: Want to switch things up? Try adding a layer of fresh berries on top before serving. This not only adds a pop of color but also a delightful contrast to the tart flavor of your no bake lemon bars.
-
Serving Suggestions: Pair your lemon bars with a scoop of vanilla ice cream or a dollop of whipped cream for an extra treat. If you’re feeling adventurous, a sprinkle of crushed graham crackers on top can add a delicious crunch.
These thoughtful touches ensure your lemon bars are not just tasty but memorable! For more insights on no bake desserts, check out Food Network for inspiration.

Serving Suggestions for No Bake Lemon Bars
When you’re ready to indulge in your delightful no bake lemon bars, consider how you can elevate their presentation and flavor! Here are some creative serving suggestions that are sure to impress your friends and family.
Garnish for a Zesty Touch
Add a pop of color and a burst of flavor by garnishing your bars with:
- Fresh lemon zest to enhance that citrus zing
- Sprigs of mint for a refreshing aroma
- A dusting of powdered sugar for an elegant finish
Pair with Refreshing Beverages
Don’t forget to consider the perfect beverage to accompany your no bake lemon bars. A chilled glass of iced tea, sparkling lemonade, or even a creamy coconut milkshake can complement the tartness beautifully.
Serving Size Matters
Cut your bars into small, bite-sized pieces. They’re rich and packed with flavor, so smaller portions make them perfect for sharing. Plus, it encourages guests to come back for another!
Ideal for Any Occasion
These bars are not just for dessert; they make fantastic snacks during outdoor gatherings, casual brunches, or summer picnics. Imagine serving them alongside some delicious finger foods like turkey bacon bites or chicken ham sliders.
By focusing on these serving suggestions, your no bake lemon bars will not only taste delightful but also look stunning on your table. Consider checking out more tips on food presentation at The Spruce Eats for additional insights!
Tips for Making Perfect No Bake Lemon Bars
Creating no bake lemon bars can be a delightful experience, especially when you get them just right. Here are some friendly tips to elevate your dessert game!
Choose Quality Ingredients
Using fresh ingredients is crucial. Opt for organic lemons if possible; their zest and juice pack a punch of flavor that makes your bars truly pop. Organic options often have fewer pesticides, leading to a cleaner taste.
Get the Right Consistency
The creaminess of your filling is key. When mixing your filling ingredients, take your time. Over-mixing can introduce air and make your bars too fluffy. Aim for a smooth, thick consistency that will set properly in the fridge.
Chill for Success
Patience is a virtue when it comes to no bake desserts. Allow your lemon bars to chill for at least 4-6 hours, or even overnight if you can wait! This waiting period helps the layers to firm up, making them easy to cut and serve.
Garnish Wisely
A sprinkle of lemon zest or a few fresh berries can make your bars not just taste good but look stunning. Consider using edible flowers for an extra flair that will impress your guests.
For more detailed tips, check out these expert baking resources: BBC Good Food and The Kitchn.
These elements will help ensure that your no bake lemon bars are not just tasty, but also a showstopper at any gathering! Enjoy creating and sharing this refreshing treat!
Time Breakdown for No Bake Lemon Bars
Preparation Time
Getting started on your no bake lemon bars is quick and easy! You’ll only need about 15 minutes to gather your ingredients and mix everything together. So, if you’re in a hurry, you can whip this up right before a dinner party or a casual get-together.
Chilling Time
After prepping, the key to achieving that perfect creamy texture is chilling. You’ll want to pop your bars in the refrigerator for 2-3 hours. This time allows the flavors to meld beautifully, giving you that refreshing lemony goodness that everyone loves.
Total Time
All in all, you can enjoy your delicious no bake lemon bars in about 2 hours and 15 minutes, including both the prep and chilling time. Perfect for a spontaneous craving or as a delightful dessert for friends! If you’re keen on trying different flavors, check out this guide on how to infuse citrus in desserts for even more inspiration.
Nutritional Facts for No Bake Lemon Bars
Calories
When it comes to enjoying delectable no bake lemon bars, you might wonder about the calorie content. Typically, each bar contains around 200 calories. This makes them a delightful treat for those looking to indulge without going overboard.
Sugar Content
The sugar content in these lemony delights can vary based on the recipe, but generally, you’ll find around 10-12 grams of sugar per bar. If you’re keeping an eye on your sugar intake, you may consider adjusting the sweetness to suit your taste.
Serving Size
A standard serving size is one bar, which is perfect for satisfying a sweet tooth without derailing your healthy eating goals. If you’re hosting a gathering, this recipe caters well, allowing for easy portioning and sharing.
For more detailed nutritional information, check out resources like Healthline or Nutrition Data. Enjoy your no bake lemon bars guilt-free!
FAQs about No Bake Lemon Bars
How do I store no bake lemon bars?
Storing your no bake lemon bars properly is key to keeping them fresh and delicious. Because they have a creamy filling, it’s best to keep them in the refrigerator. Just place them in an airtight container, and they’ll last for up to a week. If you want to keep them for longer, consider freezing them; just wrap each bar in plastic wrap and then foil to prevent freezer burn.
Can I make these lemon bars ahead of time?
Absolutely! In fact, making no bake lemon bars a day or two ahead can enhance the flavors as they meld together. They set beautifully in the fridge, and this helps them develop a firmer texture. Just remember to give them enough time to chill; aim for at least four hours, but overnight is even better for that perfect slice!
What can I substitute for lemon juice?
If you’re in a pinch and don’t have fresh lemon juice, there are several substitutes you can use:
- Lime juice: Offers a similar tartness and works well in this recipe.
- Vinegar: A splash of apple cider vinegar can add some zest, though be careful not to overdo it.
- Citrus blends: Products like bottled lemon-lime juice can also do the trick, but fresh is always best for vibrant flavor.
Feel free to explore more citrusy options or even combine different juices for a unique twist! For more on cooking with citrus, check out articles from Serious Eats or Bon Appétit.
By incorporating these tips, making and enjoying your no bake lemon bars will be a breeze!
Conclusion on No Bake Lemon Bars
In conclusion, these no bake lemon bars are a delightful treat that you can whip up in no time. Their zesty lemon flavor, combined with a creamy texture, makes them perfect for warm weather gatherings or simply enjoying as an afternoon snack. Not only are they easy to prepare, but they also cater to a variety of dietary preferences.
To elevate your experience, consider pairing your lemon bars with a refreshing herbal tea or a homemade fruit smoothie. Next time you’re in the kitchen, give these bars a try—you won’t regret it! Explore more about no bake desserts through resources like American Institute of Baking for creative ideas, or check out Serious Eats for ingredient tips.
PrintNo Bake Lemon Bars: Easy, Refreshing Treat for Every Season

A delicious and easy recipe for no bake lemon bars that are perfect for any occasion.
- Prep Time: 20 minutes
- Total Time: 2 hours 20 minutes
- Yield: 8 servings 1x
- Category: Dessert
- Method: No Bake
- Cuisine: American
- Diet: Vegetarian
Ingredients
- 1 cup graham cracker crumbs
- 1/2 cup melted butter
- 1 cup powdered sugar
- 1/4 cup lemon juice
- 1 tablespoon lemon zest
- 1 cup heavy cream
Instructions
- In a mixing bowl, combine graham cracker crumbs and melted butter. Press the mixture into the bottom of a square baking dish.
- In another bowl, mix powdered sugar, lemon juice, and lemon zest until smooth. Spread the mixture over the crust.
- In a separate bowl, whip the heavy cream until stiff peaks form. Gently fold it into the lemon mixture.
- Spread the whipped cream mixture over the lemon layer and refrigerate for at least 2 hours before serving.
Notes
- For a stronger lemon flavor, add more lemon zest.
- These bars can be topped with fresh berries for added flavor.
Nutrition
- Serving Size: 1 bar
- Calories: 220
- Sugar: 15 grams
- Sodium: 150 mg
- Fat: 12 grams
- Saturated Fat: 7 grams
- Unsaturated Fat: 3 grams
- Trans Fat: 0 grams
- Carbohydrates: 25 grams
- Fiber: 1 gram
- Protein: 2 grams
- Cholesterol: 30 mg
Keywords: No Bake Lemon Bars