Introduction to Peanut Butter Lunch Lady Cookie Bars
If you’re looking for a sweet treat that brings back fond memories of your school days, look no further than peanut butter lunch lady cookie bars. These delectable bars are a comforting reminder of simpler times, often associated with fond recollections of shared lunches and the irresistible aroma wafting through the lunchroom. It’s hard not to smile when reminiscing about those warm, gooey cookies, isn’t it?
A Taste of Nostalgia
For many of us, lunch lady cookie bars were the highlight of the school day. There was something special about those freshly baked goodies that made even the most challenging algebra classes bearable. Each bite was a mix of sweet nostalgia and pure joy. Made with simple ingredients, they are a perfect representation of homey goodness that evokes feelings of warmth, just like the smell of peanut butter filling the kitchen.
In fact, according to culinary experts, comfort food has a significant impact on our emotions. Peanut butter, a quintessential pantry staple, plays a pivotal role in these bars, offering not only an incredible flavor but also healthy fats and protein. You can read more about the psychological effects of food choices on platforms like Psychology Today.
Why Peanut Butter Lunch Lady Cookie Bars Shine
These cookie bars are not just tasty; they are incredibly easy to make, making them ideal for busy professionals. With minimal ingredients and straightforward steps, whipping up a batch doesn’t require professional baking skills. Perfect for a treat during the week or a dessert for gatherings, these bars are versatile enough to satisfy any sweet tooth.
Invite some creativity into your baking! Perhaps you want to add chocolate chips or even swap in some oats for added texture. The beauty of these peanut butter lunch lady cookie bars is in their adaptability. So, why not treat yourself (and maybe some friends) to a trip down memory lane with this easy recipe? Get ready to indulge in a delightful, nostalgic treat that’s sure to please!
Ingredients for Peanut Butter Lunch Lady Cookie Bars
Core ingredients needed for delicious cookie bars
Creating irresistibly chewy and flavorful peanut butter lunch lady cookie bars starts with a few simple yet essential ingredients. Here’s what you’ll need to whip up this nostalgic treat:
- Peanut Butter: The star of the show! Use creamy or crunchy, depending on your preference.
- All-Purpose Flour: This forms the backbone of your bars, giving them structure.
- Brown Sugar: For that delightful chewiness and touch of caramel flavor.
- Granulated Sugar: This adds sweetness and helps the bars rise.
- Butter: A must-have for richness; make sure it’s softened for easy mixing.
- Eggs: These provide moisture and help bind everything together perfectly.
- Baking Powder and Baking Soda: Essential for achieving that perfect rise.
- Salt: Just a pinch enhances the peanut butter flavor beautifully.
- Vanilla Extract: This adds a warm, comforting aroma.
Ready to get baking? These ingredients will ensure your cookie bars turn out delicious and satisfying! Check out Baker’s Secret for more tips on baking essentials.
Step-by-Step Preparation of Peanut Butter Lunch Lady Cookie Bars
Creating a delicious treat like peanut butter lunch lady cookie bars doesn’t have to be a challenge. This sweet dessert is perfect for a quick after-school snack, a casual gathering with friends, or simply satisfying a late-night craving. Let’s walk through the steps together, ensuring that you’ll have cookie bars that everyone will love.
Gather all your ingredients
To start off strong, gather everything you need. Here’s a handy list of ingredients for making these scrumptious cookie bars:
- 2 cups all-purpose flour
- 1 teaspoon baking soda
- 1/2 teaspoon salt
- 1/2 cup unsalted butter, softened
- 1 cup creamy peanut butter
- 1 cup granulated sugar
- 1 cup packed brown sugar
- 2 large eggs
- 1 teaspoon vanilla extract
- 2 cups peanuts or chocolate chips for added texture (optional)
By having everything ready in advance, you can streamline the process and reduce the chances of forgetting something crucial!
Mix the dry ingredients for a solid base
In a medium bowl, combine your dry ingredients: flour, baking soda, and salt. Whisk them together until they’re thoroughly mixed. This step not only helps to evenly distribute the baking soda but also ensures that your peanut butter lunch lady cookie bars will rise beautifully. If you’re curious about the chemistry of baking, check out resources from the American Chemical Society for a deeper dive into why these elements are so crucial.
Cream the butter and peanut butter
In a large bowl, use a hand mixer or a sturdy spoon to cream together the softened butter and peanut butter until the mixture is smooth and fluffy. This usually takes about 1-2 minutes at medium speed. This step is vital, as it helps to incorporate air which gives your cookie bars a lighter texture. Don’t be shy; the richer the cream, the better your bars will taste!
Combine wet and dry ingredients
Next, gradually add your dry mixture to the butter and peanut butter blend, mixing until just combined. It’s best to do this in batches; start with a third of the dry ingredients, mix, then add more until everything is well incorporated. After that, mix in the eggs and vanilla extract. This creates a deliciously sticky batter that’s hard to resist licking from the bowl!
Spread the batter in the prepared sheet pan
Once your batter is ready, line a baking sheet (typically a 9×13-inch pan) with parchment paper or lightly grease it. Then, pour the batter in, spreading it out evenly. Use a spatula if you need to get the batter into the corners and smoothen the top. Now is also the time to fold in those optional peanuts or chocolate chips if you decided to add them — it’s all about personalizing your treat!
Bake and check for doneness
Preheat your oven to 350°F (175°C) and bake your peanut butter lunch lady cookie bars for 20-25 minutes. Keep an eye on them toward the end of the baking time. They’re done when the edges are lightly golden, and a toothpick inserted in the center comes out clean. Every oven is a bit different, so don’t hesitate to check them a little early!
Prepare the frosting while the bars bake
While the bars are baking, it’s time to whip up your frosting. For a classic touch, mix together 2 tablespoons of butter, 1 cup of creamy peanut butter, and 2 cups of powdered sugar with a splash of milk until smooth. This frosting will add a depth of flavor that will level up your bars.
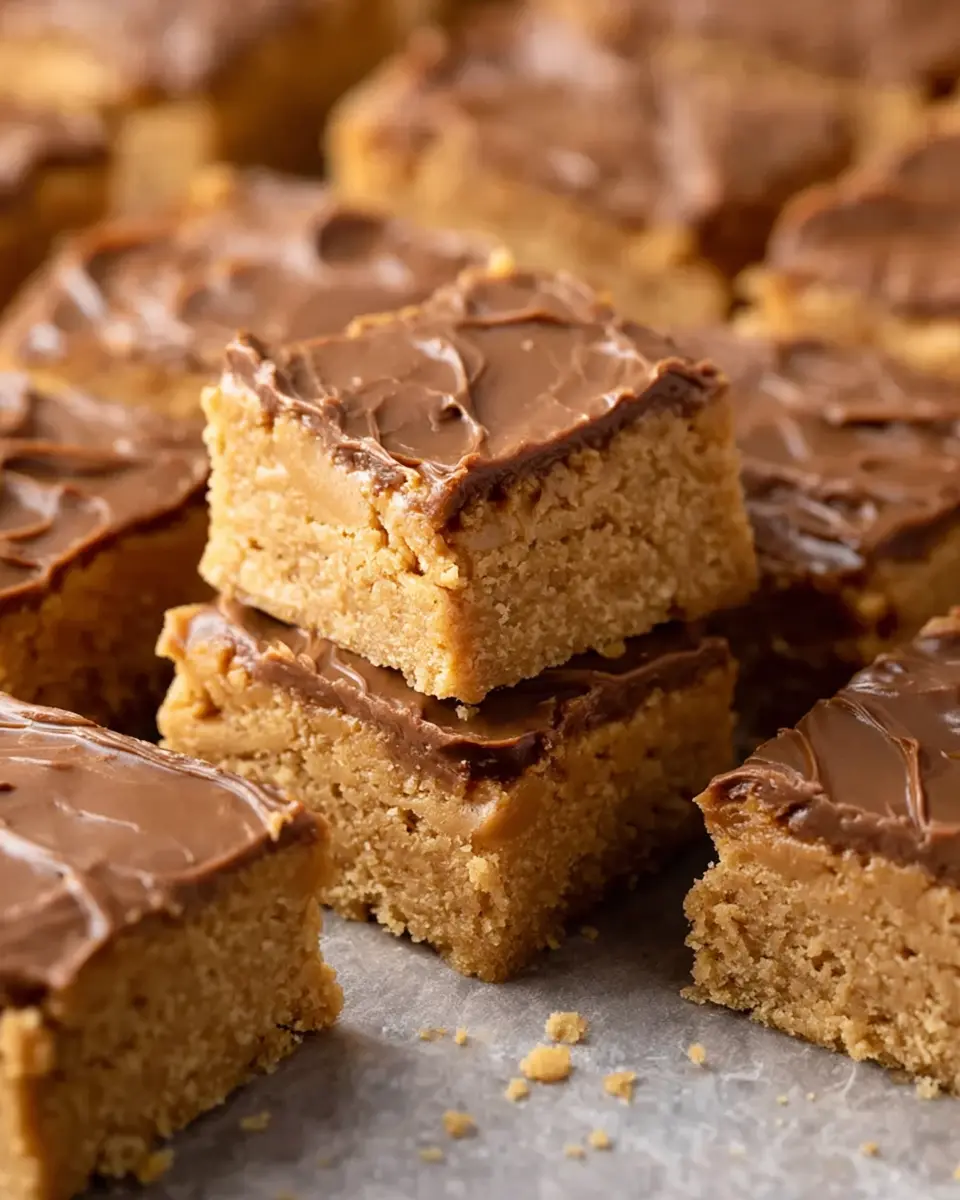
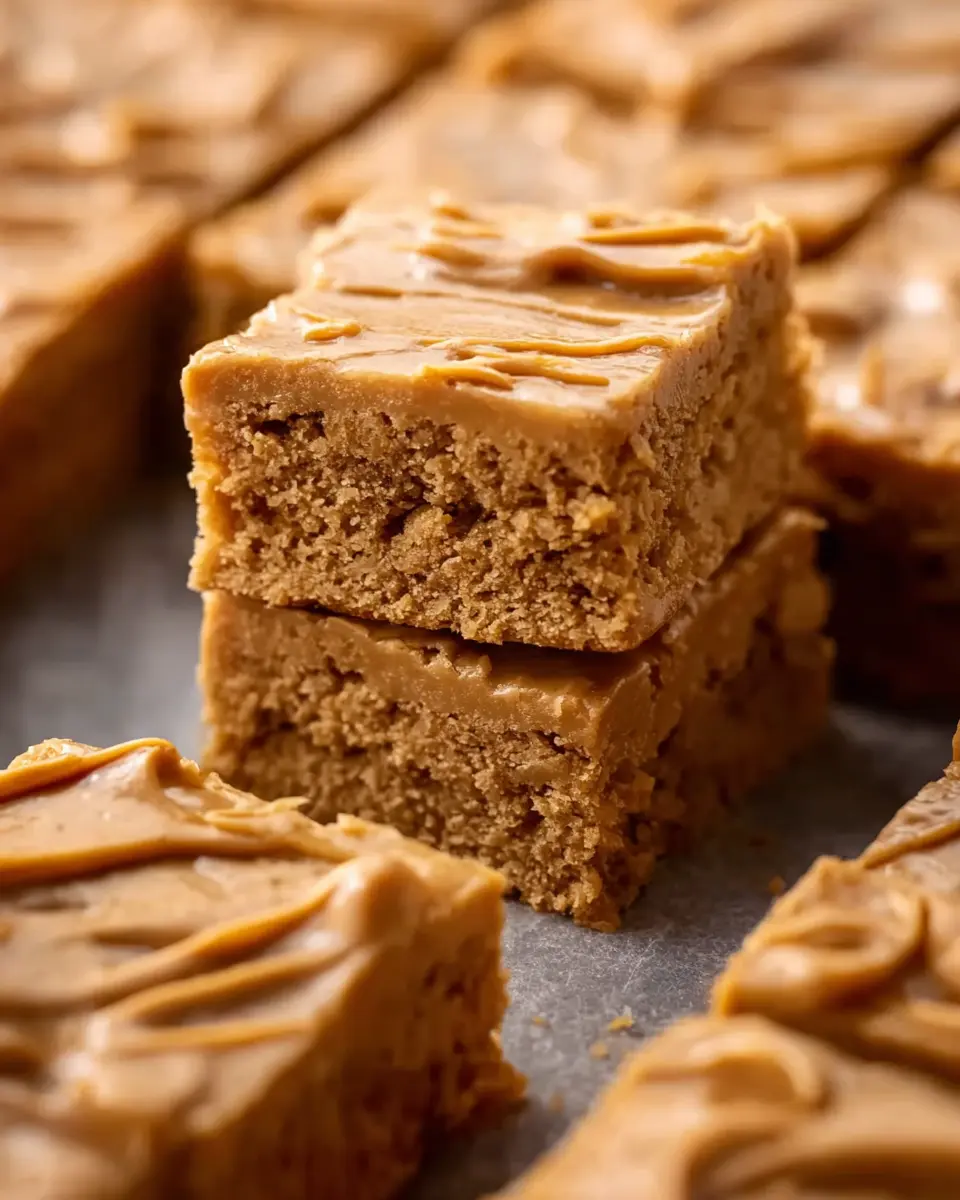
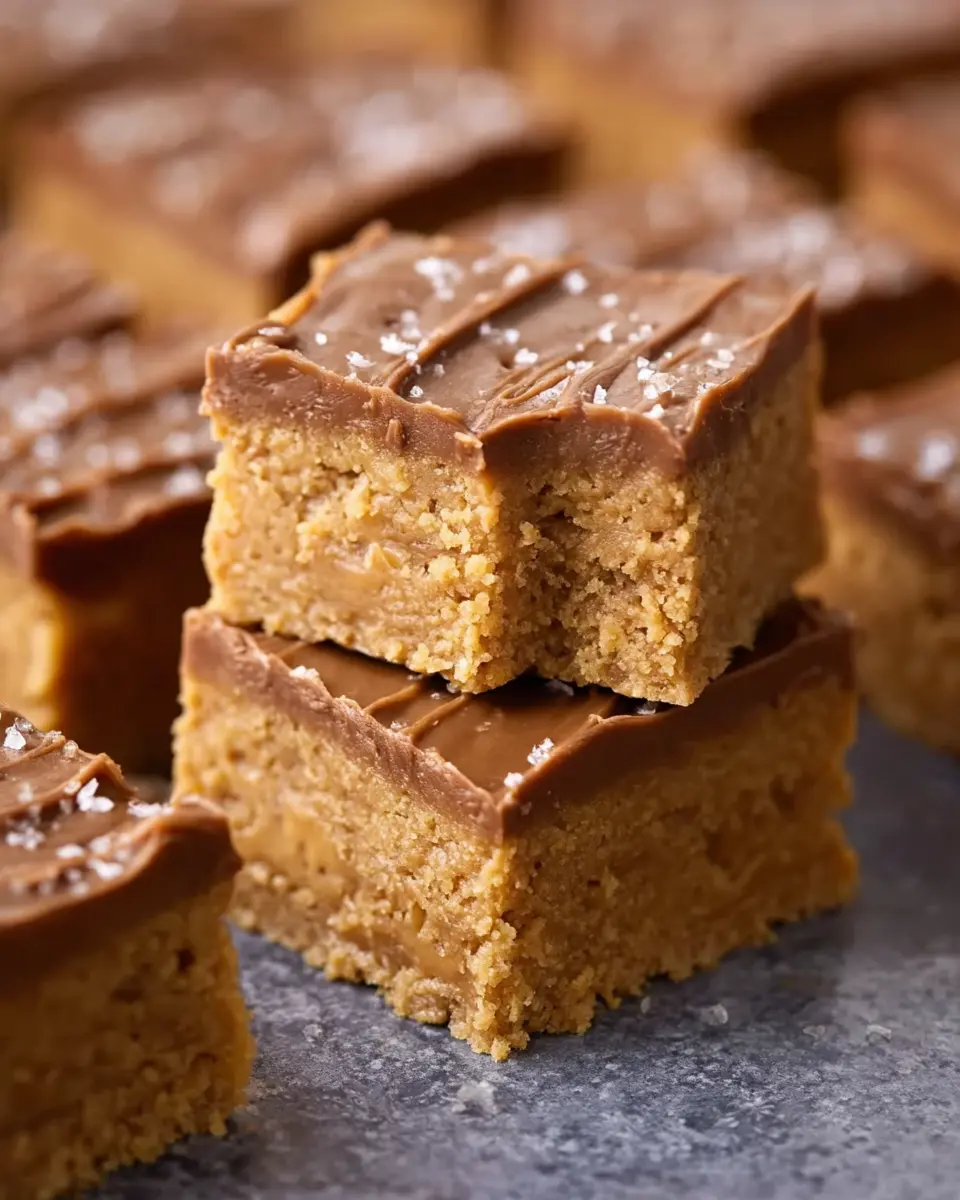
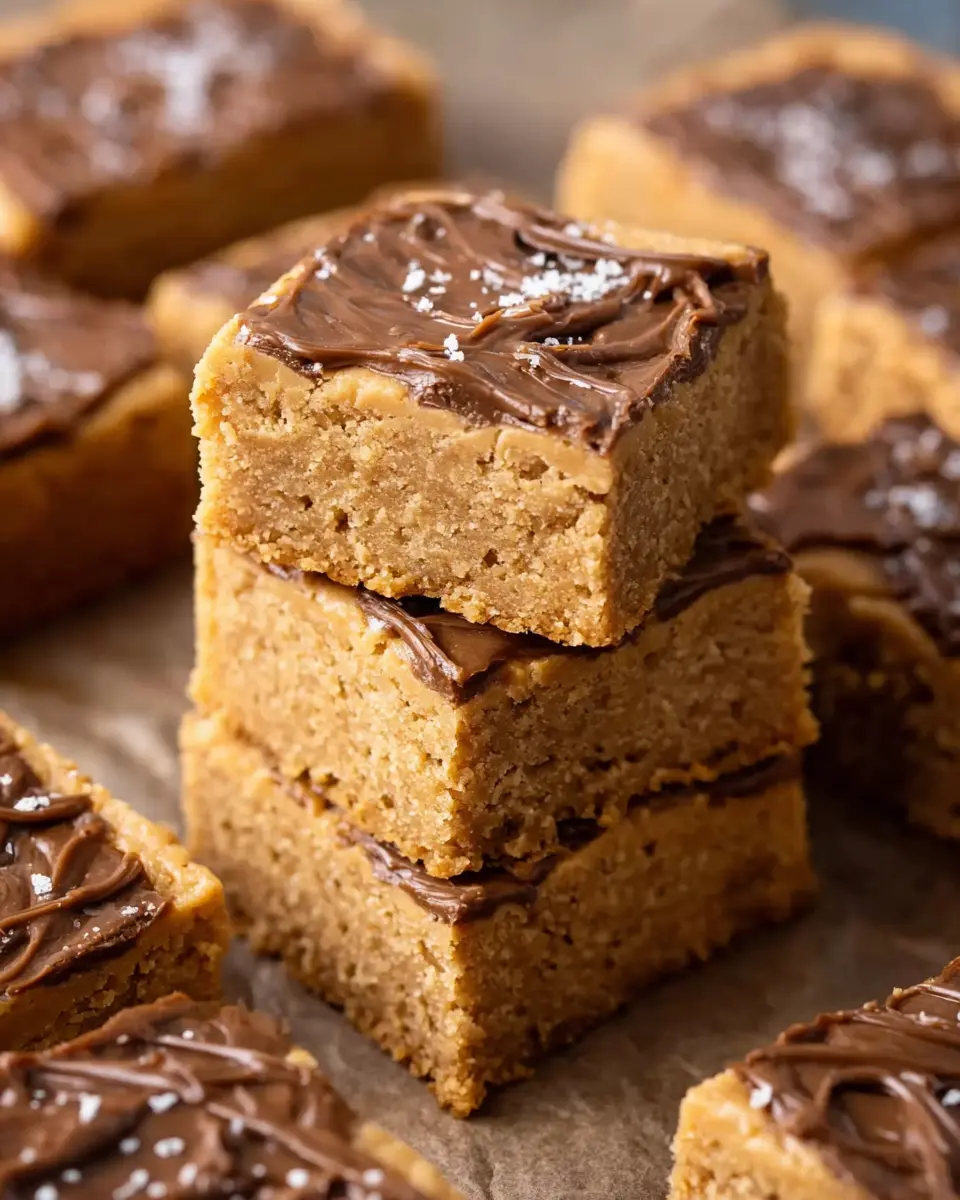
Frost the bars and let them cool
Once your cookie bars are out of the oven and have cooled for about 10 minutes, generously spread your peanut butter frosting over the top. Let them cool completely before slicing them into squares. Trust me; the wait will be worth it.
By following these straightforward steps, you’ll have a delightful batch of peanut butter lunch lady cookie bars ready in no time. Enjoy them with friends, or keep them all for yourself—they’re that good!
Variations on Peanut Butter Lunch Lady Cookie Bars
Adding Chocolate Chips for a Twist
If you want to elevate your peanut butter lunch lady cookie bars, consider tossing in some chocolate chips. The subtle sweetness of the chocolate blends beautifully with the rich, nutty flavor of the peanut butter. Whether you opt for dark, milk, or even white chocolate, each choice offers a unique taste experience.
- For an extra touch, try mixing in peanut butter chips along with chocolate for a double peanut butter delight.
- Did you know that chocolate can actually enhance the mood? According to studies, chocolate contains compounds that can trigger the release of endorphins, giving you that little happiness boost during your busy workday.
Incorporating Nuts for Crunch
For those who crave a little texture in their peanut butter lunch lady cookie bars, adding chopped nuts is a fantastic idea. Walnuts, pecans, or even almonds can provide that satisfying crunch you didn’t know you were missing.
- As you mix in the nuts, be sure to think about balancing flavors and textures. You might even decide to toast them beforehand to bring out their natural oils and enhance their taste.
- From a nutritional standpoint, nuts are a great source of healthy fats and protein, making your bars not just tasty but wholesome too. So, if you’re feeling particularly adventurous, why not experiment with a blend of different nuts?
Incorporating these variations allows you to customize your peanut butter lunch lady cookie bars to suit your taste. With a little creativity, you can make these bars a delightful and nutritious treat that both you and your loved ones will enjoy! For even more ideas, check out this informative article on creative cookie bar variations.
Cooking Tips and Notes for Peanut Butter Lunch Lady Cookie Bars
Importance of Ingredient Temperature
For the best peanut butter lunch lady cookie bars, make sure your ingredients are at room temperature. This ensures that the butter will cream seamlessly with sugar, leading to a delightful texture. Cold ingredients can cause the batter to seize up, resulting in dense, uneven bars. Before starting, take out your butter and eggs about 30 minutes ahead of time, or even longer for optimal results.
Ensuring Even Baking
To achieve perfectly baked peanut butter lunch lady cookie bars, don’t forget the power of your oven and the importance of pan placement.
- Preheat your oven: A steady temperature of 350°F is crucial for even baking.
- Choose the right pan: Use a metal or glass baking dish to ensure heat distribution.
- Check for doneness: Insert a toothpick in the center; it should come out with a few moist crumbs, not wet batter.
For more excellent baking tips, check out resources like American Test Kitchen for practical advice!
These simple adjustments can elevate your bars from good to fantastic. Remember, happy baking!
Serving Suggestions for Peanut Butter Lunch Lady Cookie Bars
Perfect pairings with milk or coffee
There’s something undeniably comforting about enjoying peanut butter lunch lady cookie bars alongside a cold glass of milk or a steaming cup of coffee. The creamy, nutty flavors of the bars meld seamlessly with the rich notes of coffee or the cool, refreshing taste of milk. For a fun twist, try adding a splash of vanilla to your milk or opting for a nutty latte to enhance the peanut butter experience.
Ideas for serving at gatherings
If you’re looking to impress guests at your next gathering, peanut butter lunch lady cookie bars can be a delicious centerpiece. Here are a few ideas:
- Dessert Platter: Cut them into bite-sized squares and arrange on a decorative platter alongside fresh fruit. Consider pairing with some turkey bacon bites for a savory contrast.
- Cookie Bar Station: Set up a “DIY” cookie bar with toppings like crushed nuts, chocolate chips, and sprinkles. Guests can add their favorite toppings for a personalized treat.
- Picnic Treats: Pack these bars for outings or road trips. They’re easy to transport and provide a satisfying snack on the go.
With such versatility, these bars are bound to be a hit! For more dessert ideas, check out The Spruce Eats for additional inspirations.
Time Breakdown for Peanut Butter Lunch Lady Cookie Bars
When it comes to preparing delicious peanut butter lunch lady cookie bars, knowing how much time you’ll need can really help streamline your baking process. Here’s a handy breakdown to get you started:
Preparation Time
Expect to spend about 15 minutes gathering your ingredients and mixing everything together. This is your chance to get creative! Add in a touch of vanilla or chocolate chips if you’re feeling adventurous.
Cooking Time
Once your batter is in the baking dish, set your timer for 25 minutes. You’ll want that delightful golden-brown finish. Keep an eye on them as they bake — the aroma will be irresistible!
Total Time
From start to finish, you’re looking at about 40 minutes. Quick, easy, and so rewarding, right? These bars are perfect for a sweet treat after a long day or a delightful dessert to share with friends.
For other baking inspirations, consider checking out these delicious cookie recipes or easy dessert hacks. Happy baking!
Nutritional Facts for Peanut Butter Lunch Lady Cookie Bars
Calories per serving
Each square of these delightful peanut butter lunch lady cookie bars comes in at approximately 150 calories. It’s a satisfying treat that won’t break your calorie bank. Enjoying these bars as an afternoon pick-me-up or a post-workout snack can easily fit into various dietary plans.
Macronutrients overview
When it comes to macronutrients, these cookie bars offer a balanced profile:
- Protein: Around 5 grams, making it a decent option for muscle repair after a workout.
- Carbohydrates: Roughly 20 grams, perfect for quickly replenishing energy.
- Fats: About 7 grams, mainly from the peanut butter, contributing to that rich flavor we love.
For further details on healthy snacking, check resources like the American Heart Association or Eat Right for insightful guidelines.
FAQs about Peanut Butter Lunch Lady Cookie Bars
Can I substitute ingredients in this recipe?
Absolutely! One of the great things about these peanut butter lunch lady cookie bars is their versatility. Here are a few substitutions you might consider:
- Nut Butter: If you want a different flavor, feel free to swap peanut butter for almond or cashew butter.
- Sweeteners: For a healthier option, you can replace granulated sugar with coconut sugar or honey, adjusting the quantity as needed.
- Flour: Whole wheat flour can be used instead of all-purpose flour if you’re aiming for a more wholesome bar.
Just remember that any changes might slightly alter the texture or flavor, so adjust your expectations accordingly.
How should I store leftover cookie bars?
To keep your peanut butter lunch lady cookie bars fresh, store them in an airtight container. Your best bet is to layer wax paper or parchment paper between the bars to prevent sticking. You can keep them at room temperature for a few days, but if you want to keep them for longer, refrigerating them is a smart move.
How long do these cookie bars last?
When stored properly, these delicious cookie bars can last up to a week at room temperature. If you refrigerate them, they can usually stay good for about 10 to 14 days. For those who enjoy meal prepping, consider freezing the bars! Wrapped tightly, they can last for up to three months, making them a perfect snack for future cravings.
For more tips on ingredient substitutions, check out this comprehensive guide from thekitchn.com.
Conclusion on Peanut Butter Lunch Lady Cookie Bars
Creating peanut butter lunch lady cookie bars at home is truly a delightful experience. There’s something incredibly satisfying about preparing your own sweet treats that not only taste better than store-bought options but also evoke cherished childhood memories. With each bite, you can savor the rich, nutty flavor paired with a soft, chewy texture that makes them irresistible.
Homemade desserts often bring joy not just to the maker but to everyone who gets to enjoy them. Consider hosting a small gathering to share these bars, or perhaps you can pack them in lunches for a scrumptious surprise. Remember, baking is about experimenting and having fun, so don’t hesitate to buy quality ingredients and try variations that suit your taste. For more delightful ideas, check out resources like The Kitchn or Taste of Home for inspiration.
PrintPeanut Butter Lunch Lady Cookie Bars: The Best Homemade Treats
These Peanut Butter Lunch Lady Cookie Bars are a delicious and nostalgic treat that everyone will love. Perfect for school lunches or an after-school snack!
- Prep Time: 15 minutes
- Cook Time: 30 minutes
- Total Time: 45 minutes
- Yield: 24 bars 1x
- Category: Dessert
- Method: Baking
- Cuisine: American
- Diet: Vegetarian
Ingredients
- 1 cup creamy peanut butter
- 1 cup granulated sugar
- 1 cup brown sugar
- 2 large eggs
- 2 cups all-purpose flour
- 1 teaspoon baking soda
- 1 teaspoon vanilla extract
- 1/2 teaspoon salt
- 1 cup chocolate chips
Instructions
- Preheat the oven to 350°F (175°C) and grease a 9×13 inch baking dish.
- In a large bowl, beat together the peanut butter, granulated sugar, and brown sugar until smooth.
- Add the eggs, one at a time, mixing well after each addition.
- Stir in the flour, baking soda, and salt until fully combined.
- Fold in the chocolate chips.
- Spread the mixture evenly in the prepared baking dish.
- Bake for 25-30 minutes, or until the bars are golden brown.
- Let cool before cutting into squares.
Notes
- For an extra touch, sprinkle with sea salt before baking.
- These bars can be stored in an airtight container for up to a week.
Nutrition
- Serving Size: 1 bar
- Calories: 200
- Sugar: 15g
- Sodium: 180mg
- Fat: 10g
- Saturated Fat: 3g
- Unsaturated Fat: 5g
- Trans Fat: 0g
- Carbohydrates: 25g
- Fiber: 1g
- Protein: 5g
- Cholesterol: 30mg
Keywords: Peanut Butter, Cookie Bars, Dessert